


A C# REPL From Scratch in ~100 lines
Try out ideas without relaunching your program

This post will show how to use about 100 lines of code to wire up a multiline REPL that supports autocomplete for rapidly evaluating code in a running C# program. The REPL implementation is likely to work in a large range of C# programs — I used it in a Beat Saber mod where I had no access to Beat Saber’s source code or project files.
Here’s a screen recording that illustrates what it’s like to use the REPL to spawn different kinds of notes in Beat Saber. When I’m ready to run the code, I hit a Visual Studio keyboard shortcut:
The ideas in this blog post are implemented in the REPLExample repo.
Before getting into the details of implementing the REPL and showing what it can do, I’ll first describe what a REPL is and why you might want to use one.
What is a REPL?
A REPL enables you to execute code in a program that’s already running. REPL stands for Read-Eval-Print-Loop. It does these steps in this order:
Reads the code that you’ve given it.
Evaluates that code.
Prints the result back to you.
Loops back to step 1 so that it’s waiting for you to provide it with more code so it can do the process again.
Different REPLs vary in important details but that’s the big picture. REPLs may also be called by different names such as a developer console or the C# Immediate Window.
Why use a REPL?
The shorter your feedback loop, the faster you can learn and the faster you can improve your program. A REPL facilitates a short feedback loop. You can write some code and see the results immediately. You don’t have to wait for your program to recompile. You don’t have to relaunch your program and renavigate back the screen that you were testing.
For example, if you were trying to tweak the size and color of a button on your settings screen, one workflow would be to:
Change the code for the button’s size and color.
Wait a bit for the program to recompile.
Relaunch the program.
Click through some menus to get back to the settings screen.
Finally, observe the button’s new size and color.
If the button’s visuals were still not to your liking, you would then repeat this process at step (1).
With a REPL workflow, you’d use the REPL to execute some code to tweak the button’s size & color and then immediately observe the effects of your change. No need to wait for the whole program to recompile. No need to relaunch your program.
I’ve found the REPL to be especially helpful when working on Beat Saber mods. Beat Saber doesn’t officially support mods so Beat Saber mod development involves a lot of reverse engineering of C# code. This is basically like working in a codebase where you don’t have any access to documentation, source code comments, local variable names, or the authors of the code. Consequently, experimentation is an important part of the process and the REPL has been valuable in facilitating a short feedback loop for experiments.
Introducing our REPL
Here is a list of the capabilities of the REPL that we’re going to build in about 100 lines of code:
World-class autocomplete. You write the REPL code in Visual Studio or whatever your editor of choice may be.
Multiline. Execute as much code at a time as you like, whether it be 1 line or multiple classes.
Rapid feedback. Evaluation happens within a second. You trigger evaluation with a keyboard shortcut within your editor. Your hands remain on the keyboard and focus remains within your editor so you can immediately begin tweaking your code upon observing the results of your previous evaluation.
Simple implementation, about 100 lines.
You can fully understand how the REPL works. If you set it up in a program you’re developing and it’s not working, you can figure out why.
It’s likely to work in many different kinds of C# programs. For example, when developing Beat Saber mods, your mods are running within the Beat Saber game and you don’t have access to any of Beat Saber’s source files or project files. This is a relatively uncommon development environment and it’s not obvious to me how to get various tools, like the Unity Editor1, to work in it. Yet it was easy to get this REPL implementation working with Beat Saber.
Despite its tiny implementation, this is the best C# REPL I’ve used. If you have some favorite REPL-like tools for C#, I’d be interested to hear about them.
Example Applications
Let’s see what this REPL can do. Here are some real examples of what I’ve used it for.
Addition
First, let’s start with a basic example of adding some numbers.
We enter some code like this into the REPL file in Visual Studio:
Info($"value: {7 + 5}");We hit a hotkey in Visual Studio which triggers this code to run in Beat Saber. We look at Beat Saber’s debug console for the result. Here’s a screenshot of how it looks:

Object Inspection
Suppose we have an object representing a Beat Saber level and we want to see the name and value of each of its properties. Here’s how that would look:

The example uses a couple of utilities I wrote in the REPL file:
LogObj uses reflection to print the name and value of any object’s properties.
GetLevel takes a Beat Saber level ID and returns an object representing that level.
Note that LogObj, GetLevel, and the other methods used in these examples are defined within the REPL file which means that, just like everything else in the REPL, they can be modified and their new implementations can be injected into the running program.
Subclass Hierarchy
Suppose in trying to understand how Beat Saber represents its levels, we’ve come across an abstract class called BeatmapDataItem. To understand all of the kinds of things that can be in a Beat Saber level, we want to find the complete list of classes that derive from BeatmapDataItem.

And we now have a complete list of the things that can be in a Beat Saber level.
LogSubclassHierarchy uses reflection to recursively find all subclasses of the given class and logs this hierarchy to the debug console.
UI Hierarchy
Suppose we want to add a new button to Beat Saber’s user interface (UI) next to the “PRACTICE” button:

To learn more about the practice button, we can dump Beat Saber’s entire UI hierarchy to a file and then search for “practice” to find the relevant section of the UI hierarchy:

This example introduces these utilities I wrote in the REPL file:
WriteAllText writes the given string to the specified file in Beat Saber’s temporary directory.
PrintFullSceneHierarchy recursively walks the entire UI hierarchy converting each element to a string containing its name (e.g. PracticeButton) and the list of the components that are attached to it (e.g. RectTransform, CanvasRenderer).
This example illustrates a useful technique: rather than limiting the REPL output to Beat Saber’s debug console, we can write output to a file enabling us to leverage external tools such as code editors and spreadsheets.
Spawning Notes
Suppose we’re trying to understand how Beat Saber represents note blocks, obstacles, and the other elements that make up a level. In particular, we’re interested in how it represents a chain, a note that is split up into multiple pieces. We’ve read the game’s code, have an idea about Beat Saber’s representation, and now we want to test it. We open our REPL file, implement our idea in a method called SpawnChain, and then we call it2:

SpawnChain spawns the chain you see in the screenshot by constructing the relevant beatmap primitives and adding them to the beatmap such that they’re scheduled to show up in the song in 1 second (i.e. at a timestamp of now + 1 second).
I used this technique when trying to understand how Beat Saber represents arcs and chains so I could handle them in BeatmapRemixer.cs, the Infinite Beat Saber component that remixes Beat Saber beatmaps.
Here’s the screen recording from earlier that illustrates what it’s like to use the REPL to spawn different kinds of notes. When I’m ready to run the code, I hit a Visual Studio keyboard shortcut:
Other Examples
Here are some other examples of what I’ve used the REPL for:
PrintSongCatalog. Write the Beat Saber song catalog to a file.
WriteBeatmap("Origins", "Standard", BeatmapDifficulty.Expert)It writes a beatmap to a file. See WriteBeatmap.
GenerateSongCatalogCompatibilityReport. Inspects each Beat Saber level and reports back any beatmap features that Infinite Beat Saber still needs to support.
Being new to Unity’s layout engine, I had to perform many experiments for figuring out how to position and size Infinite Beat Saber’s infinity button3.
That’s enough examples, let’s get to the implementation.
Implementation: Overview
These are the pieces that we’re going to need:
REPL WebSocket Server. This will be running inside of Beat Saber and listening for “Eval DLL” messages. Upon receiving one, it’ll load the requested DLL (i.e. C# assembly) into the game and call its
EvalProgram.EvalMainmethod.REPL Project: This is where we put any code that we want to inject into the running game.
EvalProgram.EvalMainis the entry point and is what was shown in all of the screenshots in the examples above.WebSocket Client. A PowerShell script that is executed each time the REPL Project is built. It sends an “Eval DLL” message to the REPL WebSocket Server which causes the latest DLL of the REPL Project to be loaded into the game and executed.
Here’s a diagram which visually shows the relationships between these pieces:

Implementation: Details
Now we’ll look at the source code of each piece, using the Infinite Beat Saber project as a reference.
REPL Project
This is where we put the code that we want to inject into the running game. EvalProgram.EvalMain serves as the entry point.
namespace InfiniteBeatSaber.DebugTools
{
    public static class EvalProgram
    {
        public static void EvalMain()
        {
            Info($"value: {7 + 5}");
        }
    }
}
That’s the key code. The actual source file contains a bunch of utilities that I’ve written while developing Infinite Beat Saber.
REPL WebSocket Server
EvalDll contains the key logic. It loads a C# DLL from the file system and then executes the DLL’s EvalProgram.EvalMain method. If that method throws an exception, it logs it.
InfiniteBeatSaber\DebugTools\Eval.cs — EvalDll:
namespace InfiniteBeatSaber.DebugTools
{
    internal class Eval
    {
        // ...initialization details omitted...

        private const string evalClassName
            = "InfiniteBeatSaber.DebugTools.EvalProgram";
        private const string evalMethodName
            = "EvalMain";

        public void EvalDll(string dllPath)
        {
            try
            {
                // Load the requested C# DLL/assembly from the file system.
                var assemblyBytes = File.ReadAllBytes(dllPath);
                var assembly = Assembly.Load(assemblyBytes);

                var type = assembly.GetType(evalClassName);
                var method = type.GetMethod(evalMethodName);
                method.Invoke(obj: null, parameters: null);
            }
            catch (Exception ex)
            {
                Plugin.Log.Info("EvalDll exception: " + ex.ToString());
                if (ex.InnerException != null)
                {
                    Plugin.Log.Info(
                        "EvalDll inner exception: " +
                        ex.InnerException.ToString());
                }
            }
        }
    }
}
The other important part of this class is its initialization which wires it up to the WebSocket server. Whenever the WebSocket server receives the relevant command, it results in EvalDll being run. Here’s the code that does that.
InfiniteBeatSaber\DebugTools\Eval.cs — Initialization:
namespace InfiniteBeatSaber.DebugTools
{
    internal class Eval
    {
        private class EvalArgs
        {
            [JsonProperty]
            public string DllPath { get; set; }
        }

        public Eval(WebSocketServer webSocketServer)
        {
            webSocketServer.Register(OnWebSocketMessage);
        }

        private bool OnWebSocketMessage(string cmdName, string cmdArgs)
        {
            switch (cmdName)
            {
                case "evalDll":
                    {
                        var args =
                            JsonConvert.DeserializeObject<EvalArgs>(cmdArgs);
                        EvalDll(args.DllPath);
                        return true;
                    }
                default:
                    return false;
            }
        }

        // ...
    }
}
You can use whatever WebSocket server implementation you want:
websocket-sharp seems to be a popular one.
For Infinite Beat Saber, I chose to handroll one (see WebSocketServer.cs) on top of System.Net.Sockets.TcpListener4 because I didn’t want to introduce any dependencies into the project for this development tool. The implementation is incomplete and not production quality but it has worked great as a part of this development tool.
In fact, you don’t even have to use WebSockets — you can wire the REPL server and client together using your preferred communication mechanism.
The actual implementation of Eval.cs is a little longer because it has error handling, it has cleanup code, and it loads debug symbols so that you can see line numbers in exceptions thrown by EvalProgram.EvalMain.
REPL WebSocket Client
The last major piece is the WebSocket client. Whenever you want to inject some code into your running program, you edit EvalProgram.cs and then compile it to produce Eval.dll. The last step of the build process executes the REPL WebSocket client which:
Connects to the REPL WebSocket server.
Sends it a message telling it to load and execute
Eval.dll.Closes the connection.
I wrote the REPL WebSocket client as a PowerShell script5 but it could be written in anything. Here’s what it looks like.
param (
    [Parameter(Mandatory=$true)]
    [string]$dllPath
)

# Immediately exit the PowerShell script
# if an exception is thrown.
$ErrorActionPreference = 'Stop'

$uri = "ws://127.0.0.1:2019/"

$commandName = "evalDll"
$commandArgs = @{
    dllPath = $dllPath
}
$message = ConvertTo-Json @($commandName, (ConvertTo-Json $commandArgs))

$client = New-Object System.Net.WebSockets.ClientWebSocket
$client.ConnectAsync($uri, [System.Threading.CancellationToken]::None).Wait()
Write-Output "WebSocket connection opened"

$buffer = [System.Text.Encoding]::UTF8.GetBytes($message)
$client.SendAsync(
    [System.ArraySegment[byte]]::new($buffer),
    [System.Net.WebSockets.WebSocketMessageType]::Text,
    $true, # endOfMessage
    [System.Threading.CancellationToken]::None).Wait()
Write-Output "WebSocket message sent"

$client.CloseAsync(
    [System.Net.WebSockets.WebSocketCloseStatus]::NormalClosure,
    "Bye",
    [System.Threading.CancellationToken]::None).Wait()
Write-Output "WebSocket connection closed"
The actual implementation is longer due to error handling.
The other thing we need to do is to wire this script up to the build system. We add the following to our REPL Project’s csproj file.
Eval\Eval.csproj — Run WebSocket Client Script:
<Target Name="Eval" AfterTargets="Build">
<Exec Command="powershell.exe ^
-ExecutionPolicy Bypass ^
-File "$(SolutionDir)debug-tools\repl\eval.ps1" ^
-dllPath "$(TargetPath)""
/>
</Target>Here’s what it’s saying:
AfterTargets="Build"declares that this should run after the build completes.Invoke the
eval.ps1PowerShell script.The
dllPathisTargetPath, the path ofEval.dll.-ExecutionPolicy Bypasssets theExecutionPolicyjust for the execution of this script. Without this, on systems with otherExecutionPolicieslikeAllSigned(Windows’s default), the script would fail with an execution policy error.
Now our REPL is functional. We can launch our program, edit Eval\EvalProgram.cs, rebuild the Eval project, and EvalProgram.cs gets injected into our running program!
Here’s another detail worth addressing. Suppose you edited EvalProgram.cs to spawn a Beat Saber note, rebuilt it, and saw your new note rendered in Beat Saber. Now you want to do it again so you tell Visual Studio to build the project and… nothing happens within Beat Saber. The problem is that the build system saw that no source files changed so it skipped all of its work to save you time. That’s a helpful optimization for a build command but our intention isn’t actually to build but to eval. So for this case, we want the build system to run even if no source files changed. Here’s how we can achieve this. Each time a request is made to build the Eval project, the first thing we do is update a source file’s last modified timestamp so the build system thinks the file has changed even though it hasn’t. Here’s the build task that takes care of that.
Eval\Eval.csproj — Touch Source Files:
<Target Name="TouchSource" BeforeTargets="Build">
  <Exec Command="powershell ^
    (Get-Item $(ProjectDir)EvalProgram.cs).LastWriteTime = Get-Date"
  />
</Target>
Infinite Beat Saber Solution
And here’s another detail worth addressing. When we rebuild our Visual Studio solution, we intend to rebuild the Infinite Beat Saber project. We don’t intend to also build and execute whatever we last wrote in our REPL. But that’s what happens currently because “build solution” builds all projects in the solution: InfiniteBeatSaber and Eval. To resolve that, we’ll configure “build solution” to skip the building of the Eval project:
In the Visual Studio toolbar, click on the popup that contains your active configuration (e.g. Debug, Release).
In the resulting menu, select “Configuration Manager”.
Uncheck the “Build” checkbox for the “Eval” project.
Repeat step (3) for each of your configurations.
Here’s what the UI for this looks like:

Infinite Beat Saber Project
We’re likely interested in using the REPL to invoke code that we wrote in Infinite Beat Saber (or whatever project we’re working on). When we try to access Infinite Beat Saber members from the REPL, we might be surprised to find that Visual Studio reports that it cannot find them:

InfiniteBeatSaber.Plugin.Log does exist but it’s declared as internal:

The REPL is in a different assembly (Eval.dll) than Infinite Beat Saber (InfiniteBeatSaber.dll) so things marked as internal in Infinite Beat Saber are not visible to the REPL.
We can resolve that by updating Infinite Beat Saber’s AssemblyInfo.cs to declare that its internals should be visible to the Eval assembly:

After rebuilding the solution we can access Log.Info from the REPL:

Visual Studio Keyboard Shortcut
I wanted to have a quick workflow for editing code in EvalProgram.cs, evaling it, editing it, evaling it, etc. So I wanted a convenient Visual Studio keyboard shortcut for triggering eval (i.e. building the Eval project).
Visual Studio has a menu item for building a project (in this case, it’s labeled “Build Eval”):

I wired it up to the keyboard shortcut “Ctrl+K, E” which I wasn’t using for anything else and is convenient to hit on my Dvorak keyboard.
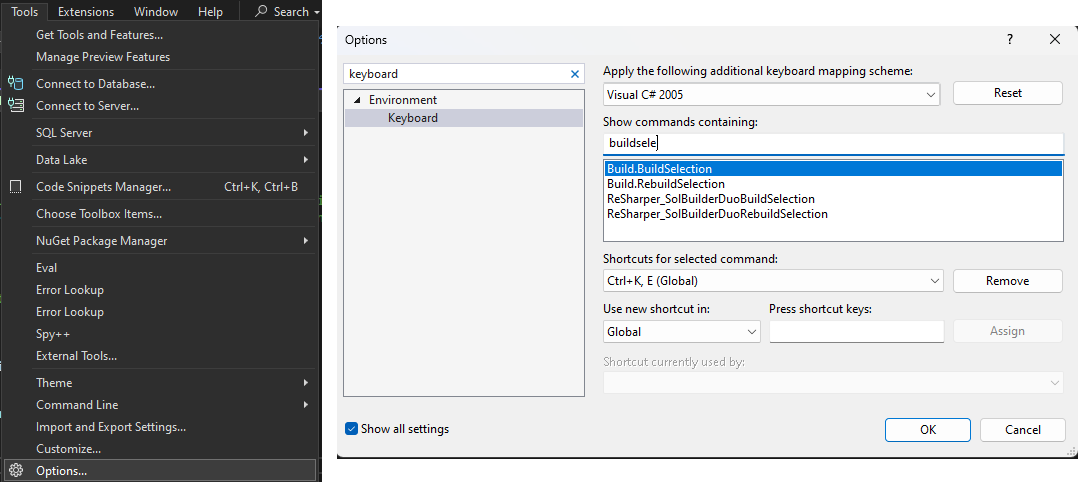
Here’s how you can set the keyboard shortcut:
In Visual Studio, choose the menu item “Tools > Options…”
In the dialog that opens, select “Keyboard” in the left pane.
In the selection list, click the item labeled “Build.BuildSelection”.
Choose the desired keyboard shortcut using the input box labeled “Shortcuts for selected command”.
Here’s a screenshot that illustrates all of this UI:
Recap
Below are links to the relevant REPL files. I’ve provided examples from two different projects in case one is more helpful to you than the other:
REPLExample. This project’s sole purpose is to illustrate the implementation of this REPL.
Commit of all of the changes that were needed to add the REPL to the console app in this repo. This could be a good starting point if you want to add the REPL to your own project.
Eval\Eval.csproj (REPL project)
Eval\EvalProgram.cs (REPL entry point)
debug-tools\repl\eval.ps1 (REPL WebSocket client)
MyApp\REPLServer\EvalServer.cs (REPL WebSocket server)
MyApp\AssemblyInfo.cs (Expose internals to REPL)
Infinite Beat Saber. An example of implementing the REPL in a real project.
Eval\Eval.csproj (REPL project)
Eval\EvalProgram.cs (REPL entry point)
debug-tools\repl\eval.ps1 (REPL WebSocket client)
InfiniteBeatSaber\DebugTools\Eval.cs (REPL WebSocket server)
InfiniteBeatSaber\Properties\AssemblyInfo\Debug.cs (Expose internals to REPL)
That’s All
This post has covered a tiny REPL implementation that results in the best REPL experience I’ve had in C#. If I had discovered it sooner, it would have saved me some time on previous projects where each experiment involved rebuilding and relaunching a large project. With this REPL, I could have skipped both of those steps cutting my development loop time down from a couple of minutes to a second.
If you have a favorite C# REPL, have an opinion about the REPL shown here, or have any questions, I’d be interested to hear from you. Feel free to leave a comment or reach out to me directly!
Beat Saber is built using the Unity game engine. The Unity Editor is the official tool for making games with Unity.
For this example to work, I loaded the level with an empty beatmap. I achieved this by commenting out this line to disable the BeatmapRemixer and then, within Beat Saber, I pressed the infinity button to start the level in Infinite Beat Saber mode. I did this because, in my experience, you can only add to the end of a beatmap. If you try to add something to the middle of the beatmap (i.e. the beatmap already contains things at later timestamps) then you’ll never see the item you added to the beatmap.
You might think that positioning and sizing a button sounds like an easy task. I thought so too. Here are some of the concepts I ended up having to explore:
Layout elements, layout controllers, layout groups, content size fitter
Anchored position, anchor min, anchor max
Pivot
Size delta
Minimum, preferred, and flexible heights/widths
If you’re wondering why I didn’t make use of the higher level System.Net.WebSockets.HttpListenerWebSocketContext, it’s because I discovered this .NET WebSocket stuff wasn’t available in Unity (at least not in version 2021.3.16). The code compiles but the WebSocket methods either don’t do anything or throw NotImplementedExceptions.
I chose PowerShell because I didn’t want to force people to install any additional dependencies to build the project.